|
Smart Matrix
|
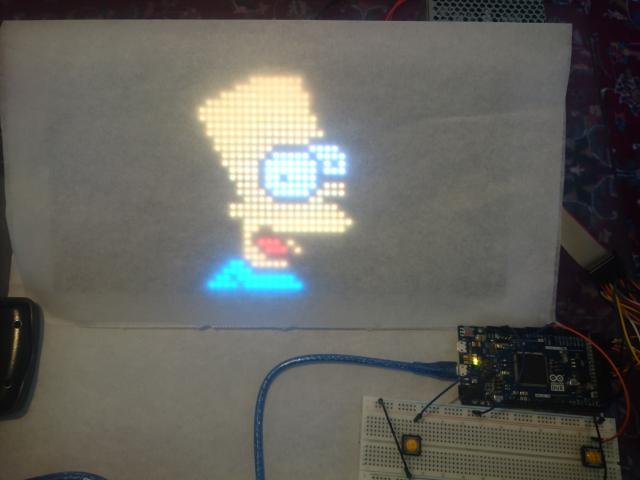
Smart Matrix is a library to control 64x32 led pannels. A dot-matrix display is a display device used to display information, photos or short video clip animations. The display consists of a dot matrix of RGB lights arranged in a rectangular configuration such that by switching on or off selected lights, text or graphics can be displayed. Smart Matrix is a library to control such matrix. The library is written in c++ Object Oriented. The main class, matrix.hpp, is used to declare and initialize the led matrix and also there are other classes to help you control the led matrix. Here you will find a quick start guide with some example to show you how the library works.
Wiring:
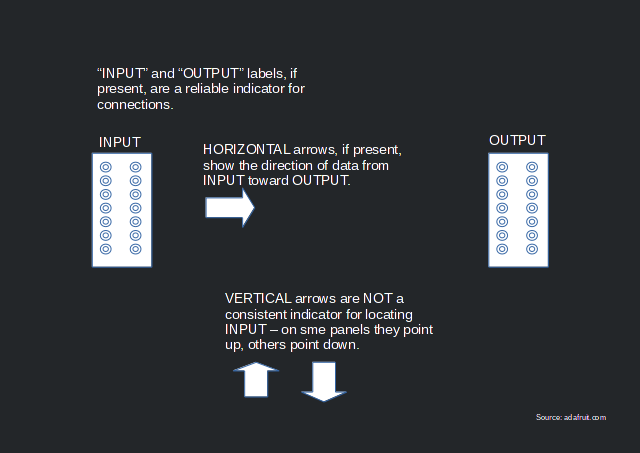
This section describes default wiring and pins numbers. The RGB panels are normally designed for chaining (linking end-to-end into larger displays)…the output of one panel connects to the input of the next, down the line. Flip the matrix over so you’re looking at the back, holding it with the two sockets situated at the left and right edges. One of them is INPUT. That's the socket we are intersting.
You need to wire you gpio pins as bellow:
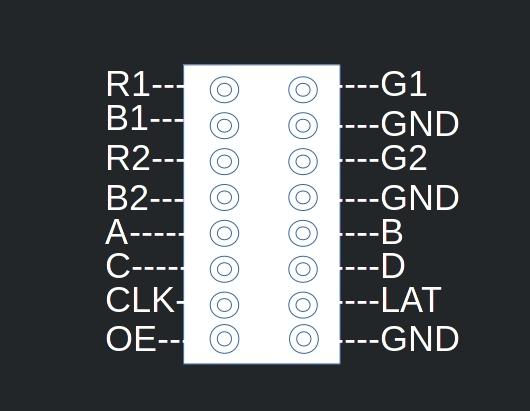
| Pin Names | Arduino Digital Pin Names |
|---|---|
| R1 | digital pin 35 |
| B1 | digital pin 33 |
| R2 | digital pin 38 |
| B2 | digital pin 36 |
| R1 | digital pin 35 |
| A | digital pin 25 |
| C | digital pin 27 |
| CLK | digital pin 39 |
| OE | digital pin 42 |
| G1 | digital pin 34 |
| G2 | digital pin 37 |
| B | digital pin 26 |
| D | digital pin 28 |
| LAT | digital pin 43 |
Matrix:
To start using the led pannel you have to initialize it. You can do it in two ways:
Here is such an example of using matrix library with default wiring:
But as already said you can use your own wiring setup. In that case you have to pass the pin number of every wire to the constructor:
The problem with above code is that you can not get the maximum performance out of you microcontroller and thus you will notice flickers and lag in animation. It's recommended to use de default wiring. To setup your led matrix with default wiring use the documentation above. for more information about both constructor refer to matrix.hpp class.
In both cases (default wiring or custom wiring) of above examples 64 is the width of led matrix and 32 is the height. Library supports a double buffering. To enable it you should pass true as 3e arrgument. The hardware of led matrix can display only two rows at once. In order to light all pixels we have to turn on and off every row quickly so that in our eyes it seems that the alle pixels are on. To that the library uses a timer interrupt functionality of Arduino Due. led.start() enables auto update, so you don't have to worry about turning on or off panel rows.
Note: The library uses timer interrupt 1 channel 1 to update the led pannel. So if you plan to use timer interrupts in your program you should not use this interrupt channel.
If you enable double buffering, drawing any pixel will occur in the back buffer. The result is not visible until you swap the buffers:
In the above example we light up the pixel (0,0) and specify it's color as "White". Colors can be in (hexa)decimal values between 0 and 2^24-1 or seprate RGB colors:
Because we already enabled double buffering we have to swap buffers to turn on pixel (0,0). This function requires an bool argument. If you need to copy the values of the updated buffer into the new back buffer you need to pass true to the copy varianle. But if you only need to swap the front buffer with the back buffer and you don't care about the old buffer (maybe because you clear the screen afterwards) the pass false to the copy variable. To avoid "tearing" swapping of buffers takes place at the end of a complete screen refresh cycle.
Note: This function doesn't have any effect if you didn't enable the double buffer in the constructor.
In order to fill the screen with a specific color you can use fillscreen function.
Here you can also use RGB colors:
There is also a clear function to clear the screen:
Show Images:
With your led pannel you can also show pictures. The max size of pictures should be at the max size of pannel. So if you have a 64 width x 32 height pannel, the size of you pictures should be maximum 64x32. The library does not scale the images for you. The library uses a special raw format for the photos. There is a python command line script helps you convert your images at any format to the required raw format. This python script is readbmp.py. In order to use this script you need to install pillow library.
The readbmp script needs two arguments, path to the photo and the name of the new raw file:
The result is a .h file you can include in your projects and use it to show the photo on the screen:
in the above example vector(35,0) is the location of the library. in this library you should pass location and size of something as a vector(x,y). See also vector.hpp
Show Animated Images:
Not only Images can be shown but Animated Images can also be shown on the led matrix. To use this feature you have to convert a gif animation file to a raw animated image. To do this you can use a python script make_animation.py. This script depends on a pillow library:
The make_animation.py script needs two arguments, path to the gif file and the name of the new raw animated file:
The result is a .h file you can include in your projects and use it to show the animated image on the screen:
The above code prints animation at location (15, 0). De default is one time from start to end with a update interval 10 milliseconds between each frame. In order to change de update interval and loop option you can declare the function as:
The above code prints animation with 5 milliseconds update interval between each frame and loop option set to true.
Note: The draw() function of AnimatedImage class doesn't need the buffer_swap operation.
You can also print a specific frame of an animated image file:
The value of frame number must be smaller than total frames, otherwise nothing will be printed on the screen. You can get total number of frames of an animated image by:
The result is an intger value.
Show Text:
Texts can be shown on the screen by using String class. This class needs a font. You can convert any .ttf font to font supported by the library. In order to convert a font you can use a python script make_font.py. This script depends on a pillow python library. You have to first install it:
The make_font.py script accepts 3 arguments: font path, size of the font you want to use and the name of new font:
The result is a .h file. A tahoma.ttf font converted with size of 10 to a supported font with name tahoma10. You can use this font by string class to show text or scroll text on the screen:
"Hallo World!" is the string to be written on the screen. You have to typecast your string first to char*. for example if you want to print "Hallo World" you have to pass it like this: (char*)"Hallo World". You can also use RGB colors:
In order to scroll text from right to left on the screen you can use scroll function:
This function scrolls the text from right to left at the speed of 10 milliseconds. By default the loop is set to false and the start point of scroll is at width = 64; In order to change the default behavior you can declare the above function like this:
The above code scrolls the text at the speed of 15 milliseconds per pixel and the loop is set to true. Also notice that the start point of scrolling is width = 32. It means the text will be scrolled from pixel(32, y) to pixel(0,y).
Note: By using scroll function you do not need to use swap_buffer();
Compile:
In order to compile your code you need to use make file. This project uses bmptk make file made by Wouter van Ooijen. Just add your source files to the Source section seprated by space here is such an expample of make file for the RGB-Matrix library:
Upload:
In order to upload your project and send it to the Arduino Due you need "bossac" commanline tool.
 1.8.11
